
When Production begun I already had an idea of what the game would look like and the general size because of the planning I’d done during Pre-Production. Since I had done this, very little thought needed to be done I knew I’d be building a large amount of the buildings in UE4, so I started there. I also knew that I’d be building modular components that fitted together nicely and seamlessly together.
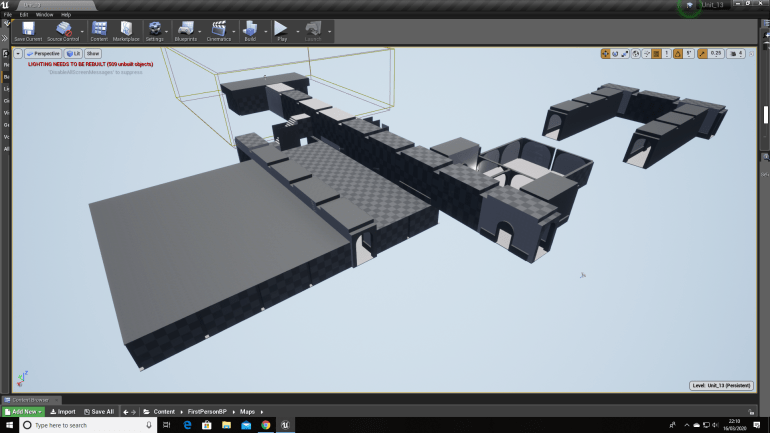
I began with a basic tunnel something I would rely on to create a majority of the level and that I can alter to build slight variants of it that would allow me to create corner and doorways at intervals.

I wanted the feel to be basic but not to boxy or square which is the reason for the curved ceiling and the wall protruding at waist height. I wanted to build the layout of the map first so I could get a good feel of size and proportion.
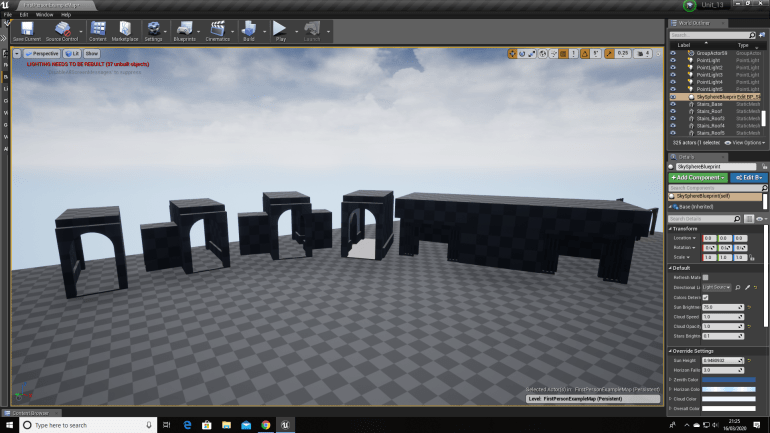
Once I had made these components I turned them into static meshes which would allow the game to run more smoothly. Immediately I noticed a problem, I hadn’t actually textured any of the tunnel which wasn’t a massive issue at this early stage of Production, but would become more apparent later on so I decided to solve it now and save me the headache later on.
Art Style:
I had converted them into Static Meshes but before I had created a duplicate just in case something like this arose so I would always have an unaltered backup. I learnt this during Unit 8 and this has been a useful part of large project in case I run into problems. Texturing wasn’t particularly difficult I settled for some basic concrete materials, a pale one for the large sections of flat walls and a darker one for the border walls, pillars and edges.
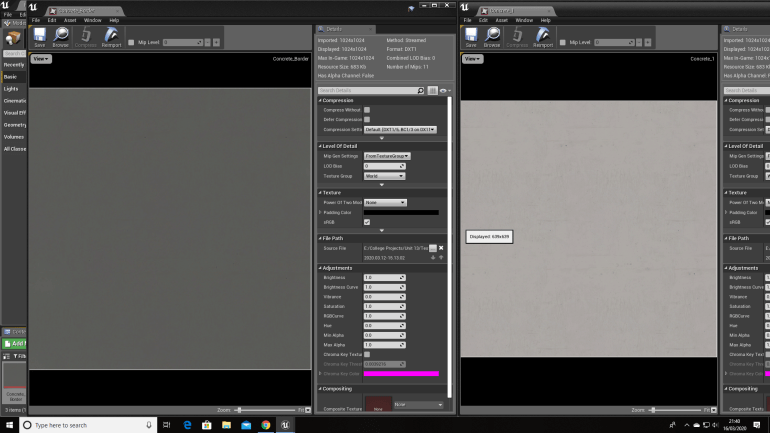
I settled for very basic textures because not only would Bunkers in this era be made from concrete because it was strong and cheap but also I would be getting a lot of detail from decals which act as almost stickers in UE4.
I am planning to use decals heavily during this project because they’re so versatile and adaptable, and can be used to make anything look so much better and more complex.
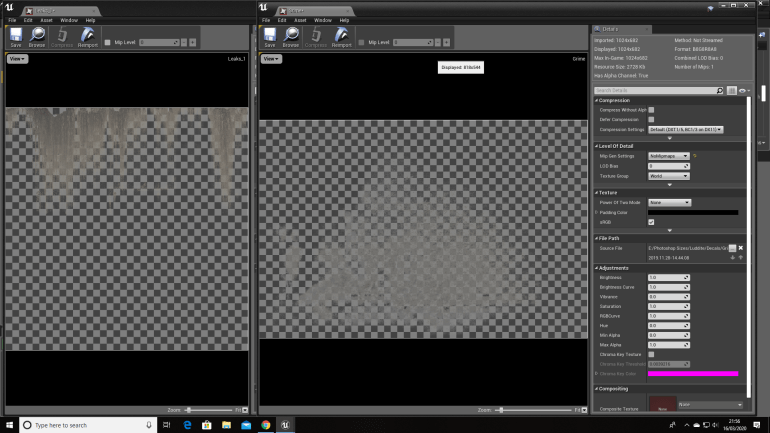
I discovered decals during The ‘Production 2’ project in my first year, before I knew they existed I was creating several variants of the same wall texture but with a different scribble or drawing on it and it was time consuming because I also altered the background texture too so they looked different but still tiled together properly.
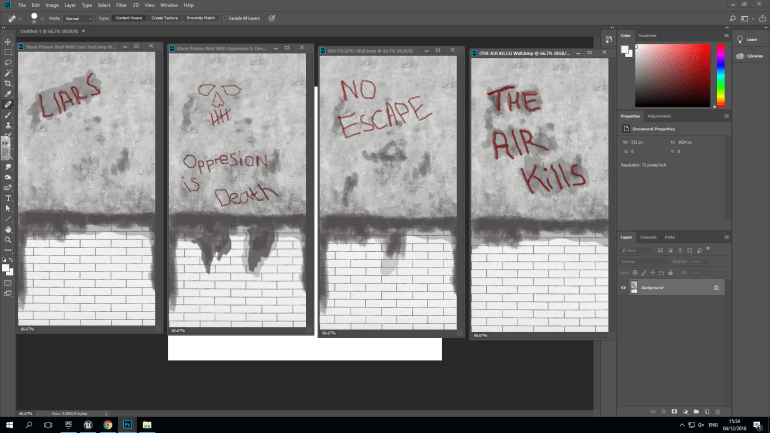
The above images show 4 similar textures I used for the walls, with different messages wrote on them and this was time consuming because after making one I would have to restart completely with the tiles and concrete blend them together using the paint tool and then use it again for the messages. Decals would of made this so much faster since the messages would of been made separately so I could of used them in different ways to instead of just on walls.
The thing that really showed me how versatile they were though was a video on YouTube I saw by a group called Quixel who created a series of programs for games developers. The video defines just how useful decals can be when leveraged properly and how much personality they can give to an environment.
‘Create Silent Hill In UE4, 2019, (Video) Wiktor Öhman’ ‘Accessed 2/4/20’
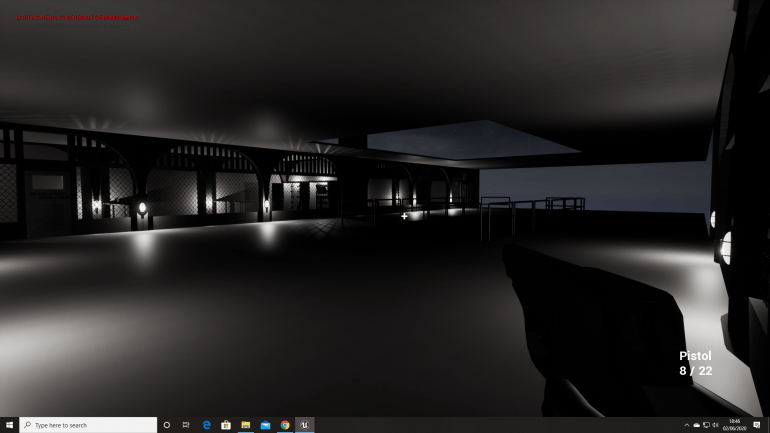
I also want to mess around with lighting a bit too create a moody and dismal atmosphere that I think a good horror survival game should have depending on the theme. I read a ‘Gameasutra’ blog on lighting and towards the bottom it mentions a lot on lighting.
‘Houze R, 2019, What is the effect of the lighting design process on game aesthetics and its influence on the gaming experience ?, https://www.gamasutra.com/blogs/RonanHouze/20191007/350484/What_is_the_effect_of_the_lighting_design_process_on_game_aesthetics_and_its_influence_on_the_gaming_experience_.php, 9/5/20’.
The blog outlines several different techniques of using lighting effectively in games, such as using hue, saturation and brightness to divert or draw a player’s attention to and has been used in the past heavily to guide player’s through levels. Lighting is also used to create mood and atmosphere. Bright lighting usually indicates happiness and serenity, but moody lighting usually indicates danger and helps build suspense. You see this in films to and it’s a commonly used practise to create suspense, and I’ve used this technique to create a dismal and depressive tone in my game.
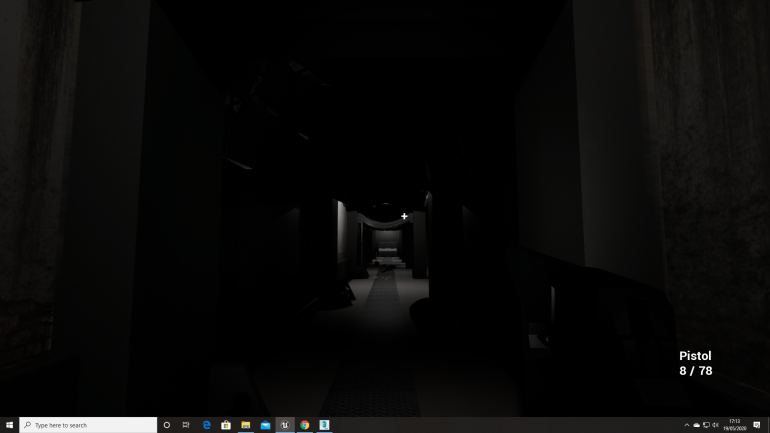
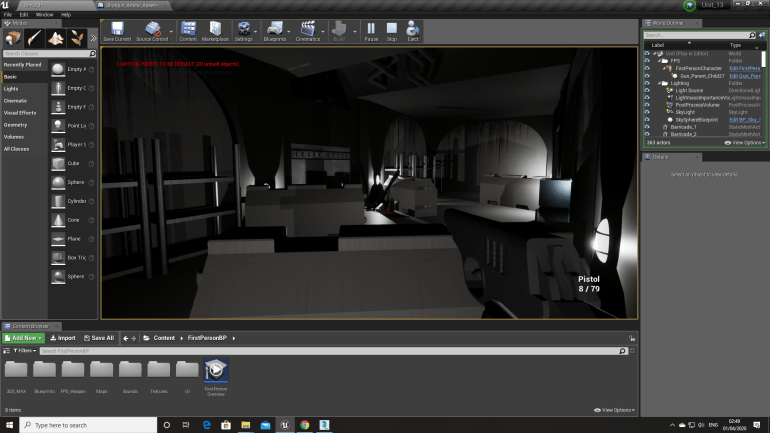
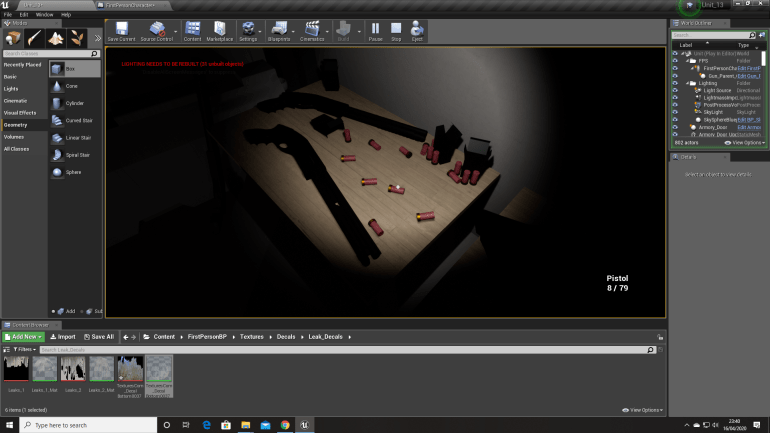
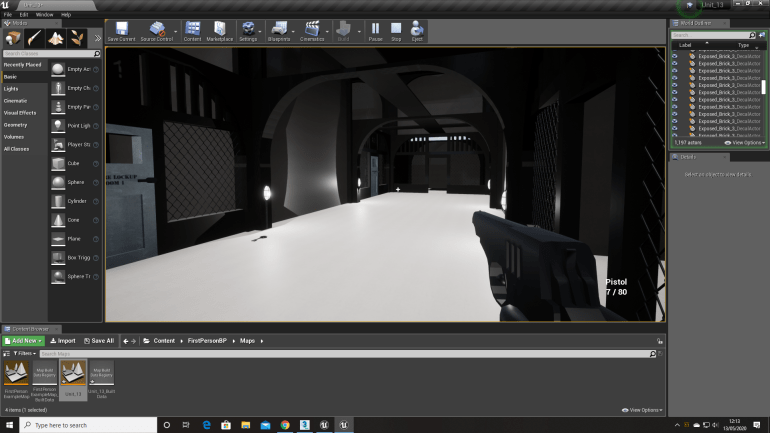
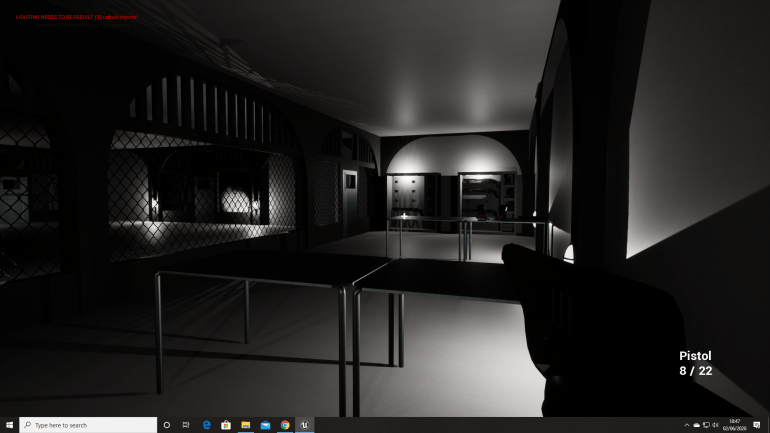
This is what the unfinished map looks like so far a series of corridors and rooms that all link together and when finished I will begin filling with smaller assets and zombies and other things that the player will need to collect to help them through the game.
Since I was making a zombie survival game, the needed to be a survival aspect of it, so the was actually something for the player to manage and use to survive. I knew the was going to be a shooting aspect to the game so I decided to leave the map building part for a little while and have a change of pace. The was also a few other reasons why I wanted to focus on something different for a little while, a big one was I wanted a change of pace though and secondly after doing this I could get a better feeling for the how the player would feel when greeted with this environment.
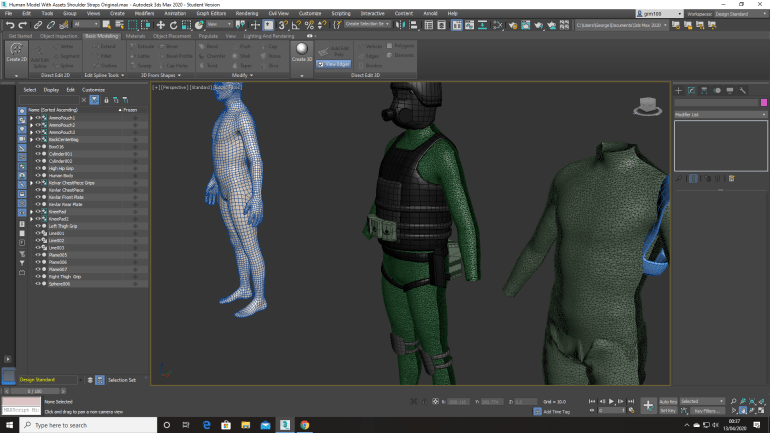
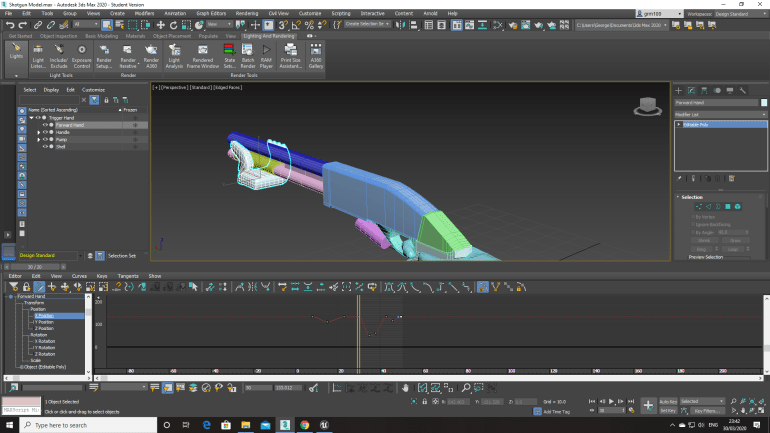
I wanted to create a pistol, something that the player could use to defend themselves from the zombie threat in the game, I knew I would have to use 3DS Max to create this and because I had spent the last project familiarising myself with it, I was keen to create something really impressive and try and push myself.
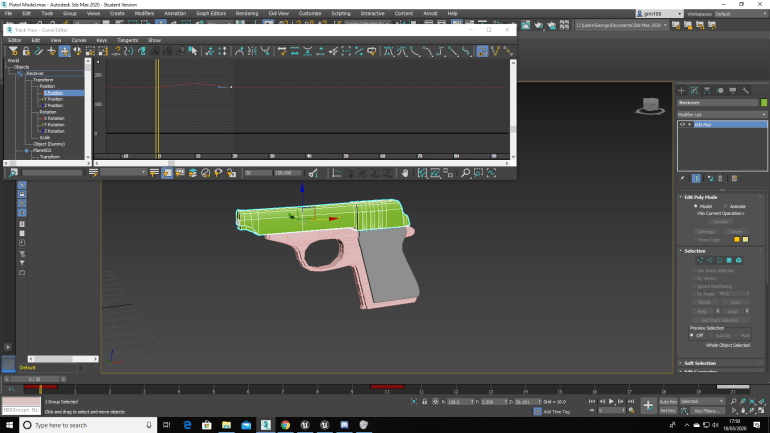
I spend a few hours creating a pistol model in 3DS Max separating the several different parts because I wanted to animate it to allow it to look as real as possible. The Receiver at the top was a separate part that allowed it to slide back without the rest of the gun moving. I did encounter a lot of problems when creating this gun though and it’s design went though about 4 or 5 different Iterations each model becoming slightly more advanced than the last which took a lot of time and effort but I wanted to put everything into this final project so I didn’t mind. Although I had spent the most recent project in 3DS Max I hadn’t used the Curve Editor the section that allowed me to animate models using Keyframes so I did have to adjust myself to them again.
After exporting it into UE4 with animations I wanted to set up my project so that the gun actually functioned and during Unit 8 I followed a few particular videos on the internet explaining how to create simple FPS game and since the system he used was very simple it was also extremely modifiable and would allow me to make easy changes down the line if necessary.
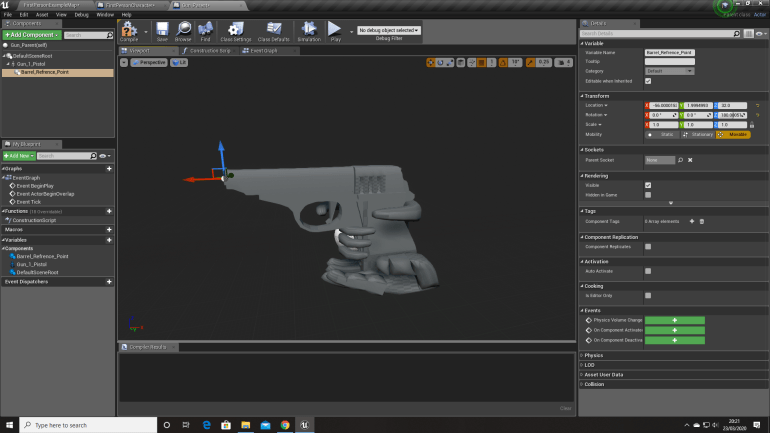
The Final Iteration of the Pistol had hands included with the model and firstly when I imported this into UE4, I encountered a problem that wouldn’t allow me to use the model how I wanted, so I did a bit of research and try to find the source of the problem and figure it out. However I couldn’t find anything that would fix it but after a while of thinking I managed to sort it out myself, all I needed to do was group it in 3DS Max and this combined all the Skeletal Meshes and Animations which fixed the problem and I now know what to do in future if I encounter a similar problem.
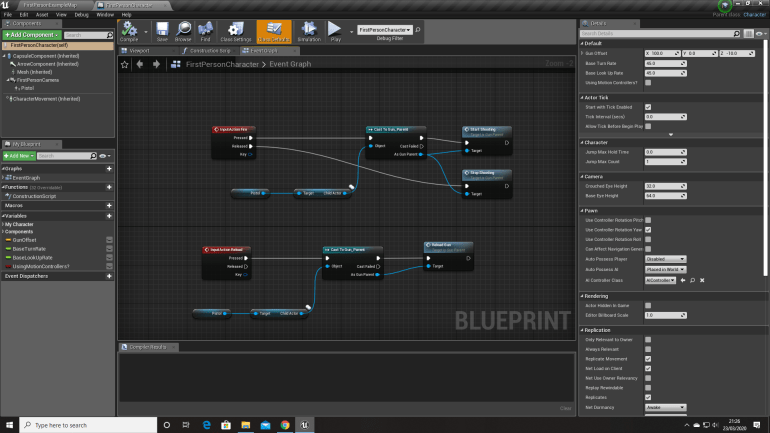
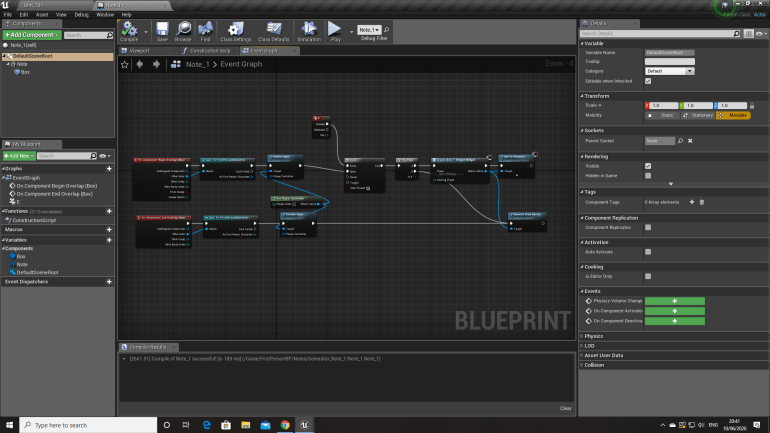
The Red Boxes are Inputs and connect to the certain Blueprints that actually carry out the Animation and Blueprint necessary.
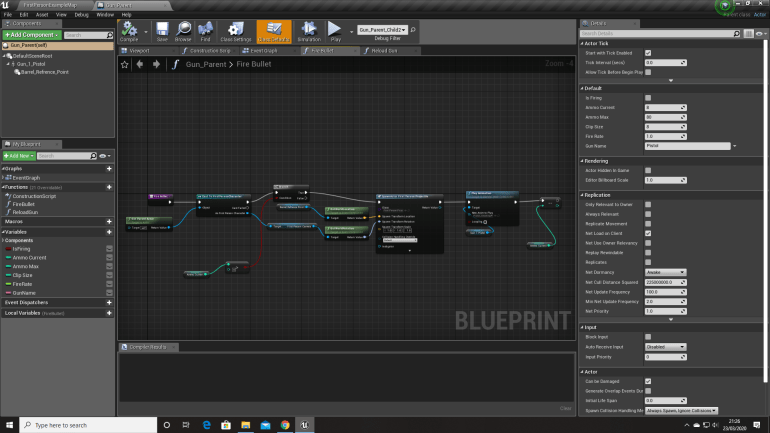
This Blueprint allows the game to know the Location and Rotation to the Gun and spawns a projectile and also plays the Firing Animation that I made in 3DS Max, and when the Gun runs out of Ammo it’s doesn’t fire a Projectile or play the Animation.
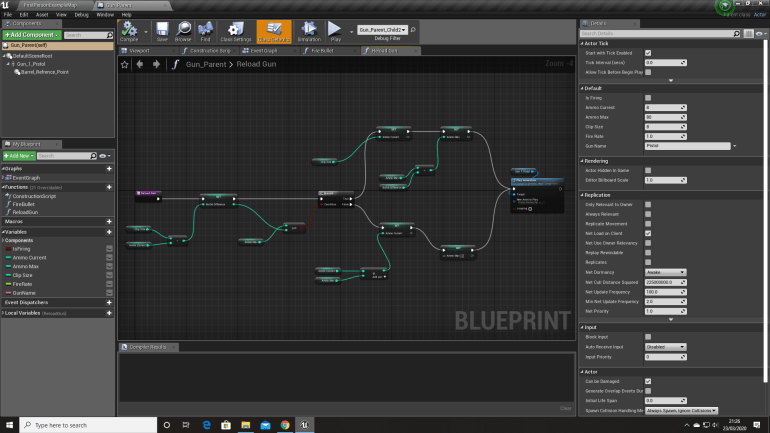
This Blueprint calculates the amount of Ammo in the magazine of the Gun and when it reaches zero the player can press a certain button ‘R’ and the game will play the Reload Animation I made and refill the Gun’s Magazine and remove it from the Ammo Max Number.
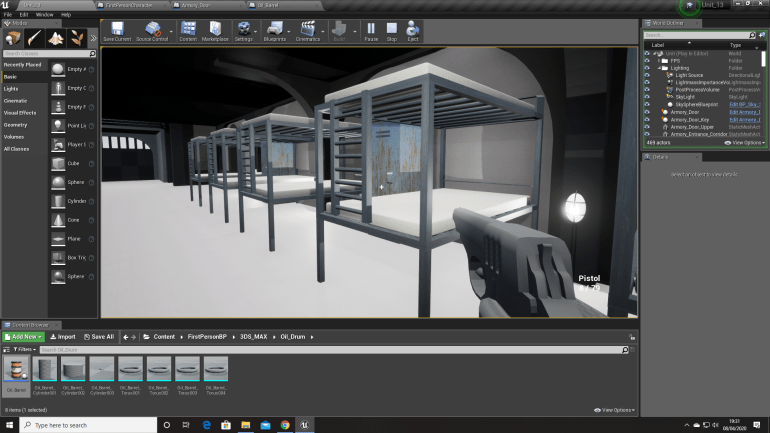
After I finished this I wanted to start filling the environment I made with different assets and create a realistic living in, dystonia themed environment. I made a few models like Barriers, Shelves, Lockers and Beds.
Since this was a Zombie Survival Game, I wanted to player to think a real fight took place here so the’s barriers with weapons and ammo behind them suggesting that a ‘last stand’ sort of situation took place here. However, I did run into a problem with the door that can be seen in the background.
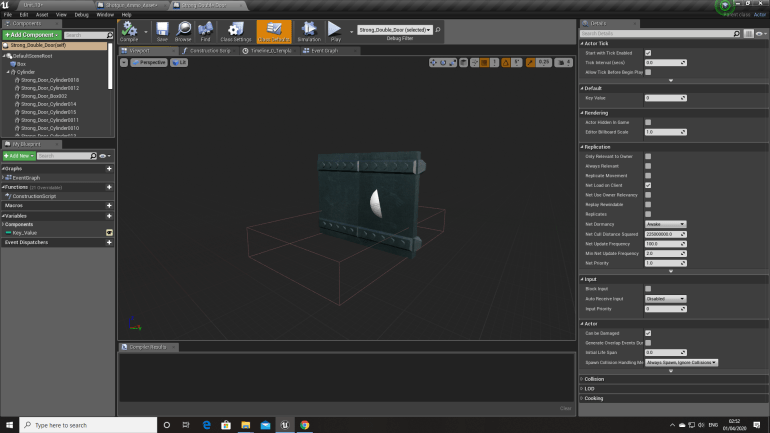
Originally I wanted the player to explore an environment, but I thought maybe I could add a challenge of Keys that you have to find to open certain Doors that give the player access to different areas with different items, possibly Armor and Ammo. This type of game play rewards players that explore around and this perhaps shows that the player is more involved and invested in the game.
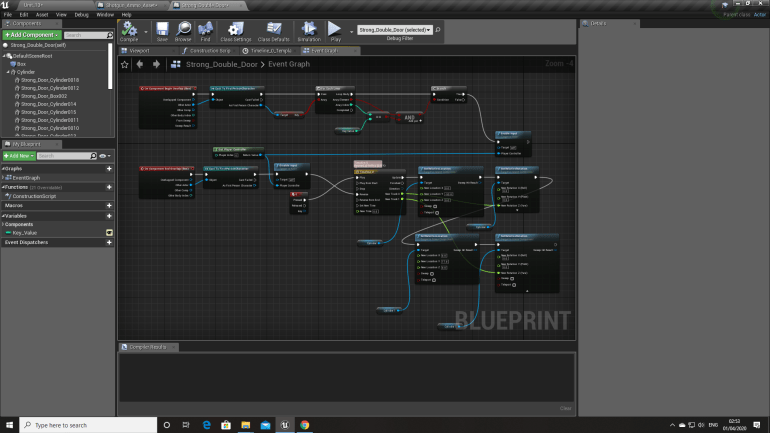
I had to use a Timeline to animate the door and even though I’d used it before in previous projects I had forgotten had to do it, so I went back though Blog Posts to remind myself of how to do it and I managed, but it was frustrating because even after re-learning it I kept doing things wrong but eventually figured it out through trial and error.
I wanted the base to seem like it was inhabited so I wanted a place where the inhabitants would eat, sleep and spend their free time. I decided to create a dormitory with bunk beds that I made in 3DS Max, and because the base is going to be very dark I wanted to create a wood burner that would throw out some nice warming lights into the dark environment.
The reason I choose to make the beds like this is because I wanted to create a simple design but one that would also make sense in a location like this. Since it’s a military base comfort wouldn’t be very high on the ‘list’. I then used a aluminium material for the metal which I think works well in low light environments and a fabric texture for the mattresses.

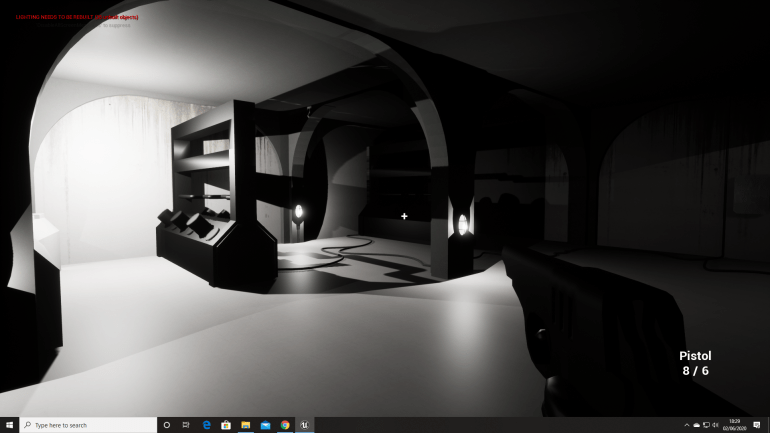
This is the Dormitory with the ‘Light Source’ turned upside down and the ‘Lux’ reduced to 0 creating a night time effect, since this a survival horror I wanted the environment to be creepy and scary giving the player a spooky environment to explore.
I thought the areas seemed quite empty though and wanted to fill some of the rooms and corridors up with assets so I made a few.
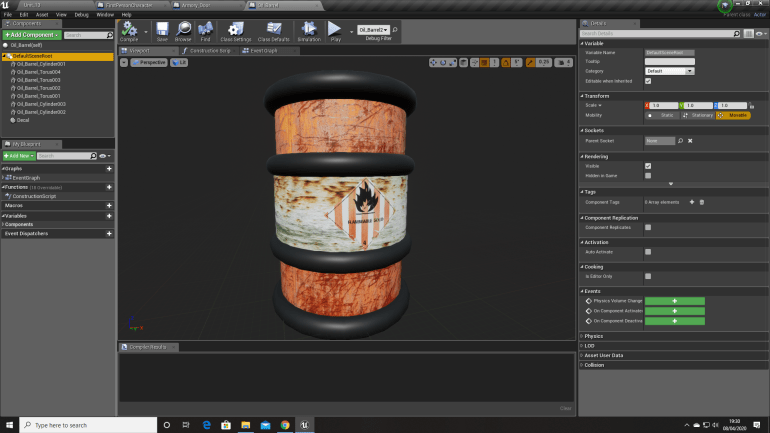
I made a barrel in 3DS Max to place around the environment so it felt a bit more filled up and less empty. I used decals for the first time inside blueprints for the little ‘Flammable’ icon and I think it made a massive improvement to the quality of the barrel.
When creating this environment I wanted to create several areas where the soldiers had tried to hold out and then died, with this in mind I had to think what the areas would look like and what sort of thing you would expect to see there. I decided to add table, barriers, lockers and obviously spare weapons and boxes of ammunition.
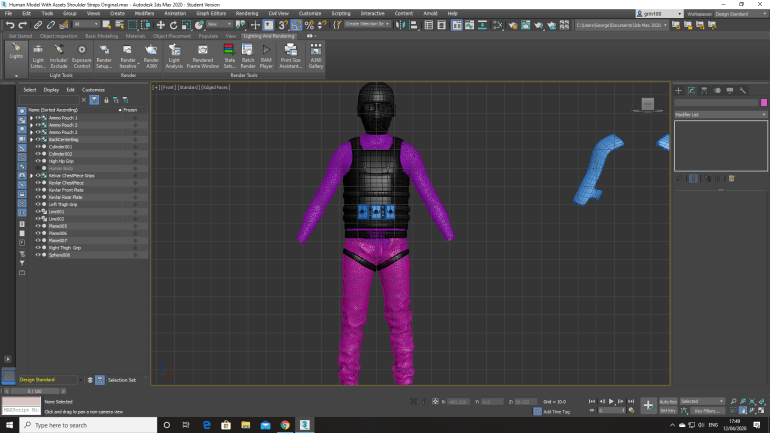
The would obviously be corpses too so I went into 3DS Max and used the pre-existing soldiers model I made in the previous project.
I made arms and legs using a tutorial I found on the internet since I had no idea how I would achieve this. I ran into a few problems while doing this, which didn’t allow the trousers to form properly on the legs which was irritating and annoying to figure out since it was a large and noticeable problem but after watching the video a few more time I found out where I had gone wrong and managed to fix it.
During the first Play day where we see each other games and give feedback on others games such as what we would like to see and certain improvements we think could be made.
I was reading though some feedback people gave me, and wanted to add some of the suggestions because some of them made sense and I think would look really good in the areas that I made. I wanted to add electronics and cabling along the walls because it would help dress up the walls along with the textures and decals making the environment more interesting.

I thought air conditioning would be a interesting ideas and could cast some nice shadowing on the environment using lighting, such as having an aircon unit in the ceiling and being able to see the shadowing of the fan slowly revolving and I think that would act as a nice addition to some of the areas.
I decided to create some particle effects to place inside of my game, I wanted to make heavy rainfall and sparks that could bounce off of wiring and the rain could fall in though holes in the ceiling.
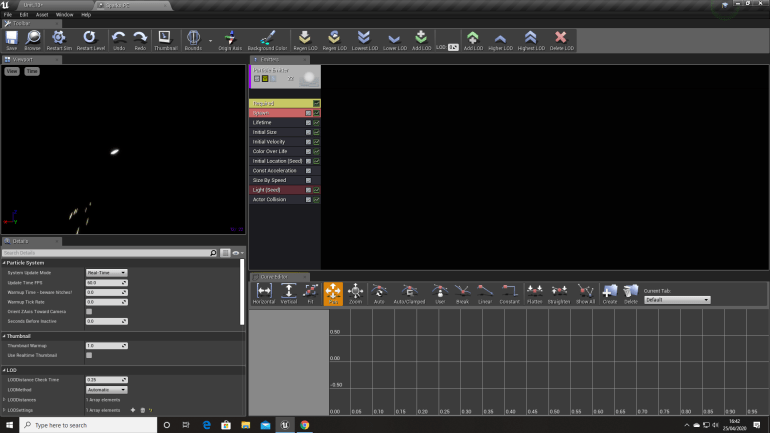
One of the biggest changes I had to figure out when making sparks was removing the constant modifier that causes the emitter to constantly spawn particles which would be unrealistic for something like this. Instead I used ‘Burst’ which spawns a burst of particles that you can change and modify. I added two of these to create a slight difference in the emitter so the particle doesn’t look so repetitive and unnatural.
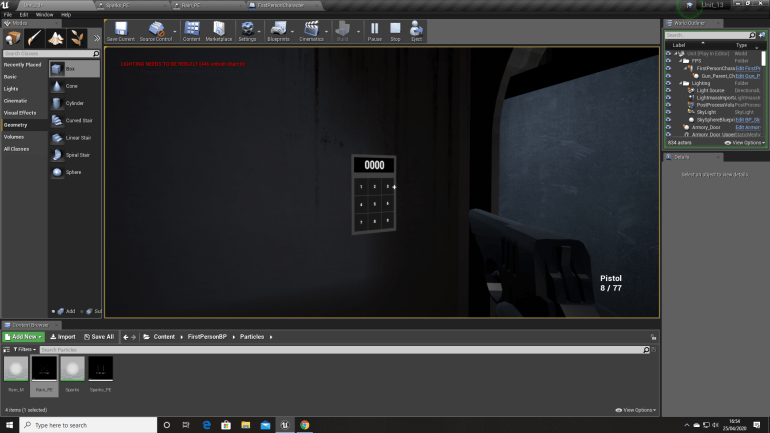
Another suggestion from my survey was a Key Pad Door I had to do a bit of research when creating this since I had absolutely no idea where to begin. I knew that the actual door model and animation I could manage since that’s very basic stuff.
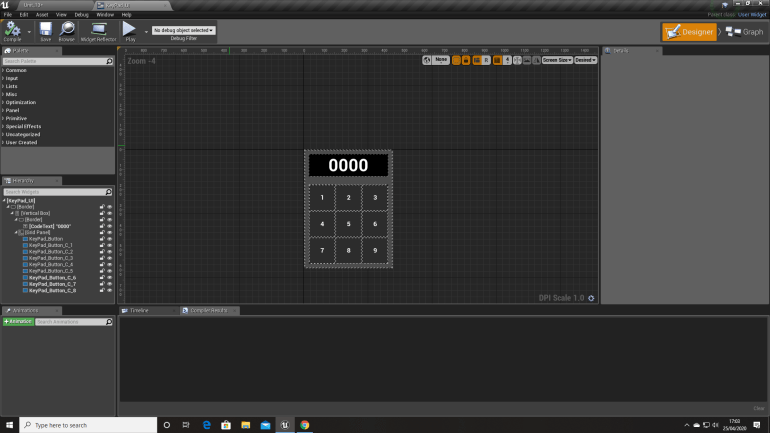
This is the Widget inside of the editor, each Key is a separate smaller widget and I change the number each time and duplicate it 9 times to create the actual Keys. The larger rectangle at the top displays the keys that have been pressed and resets after a 4 digit number has been entered.
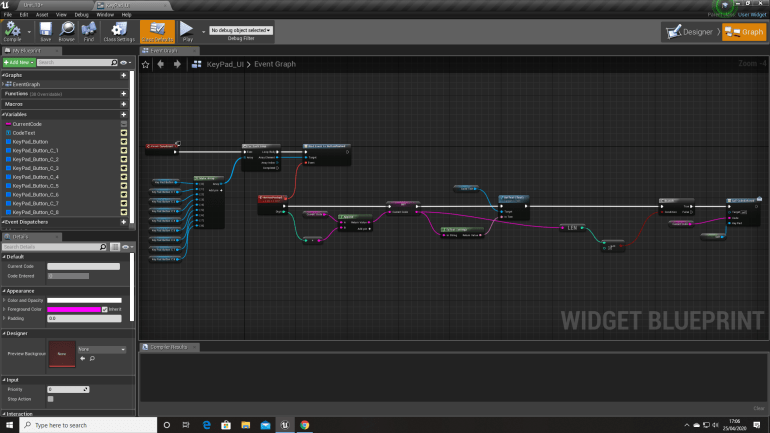
This Blueprint understands firstly which number has been entered and places it on the rectangle at the top and does this 4 times over and resets the ‘code entered box’ to blank when 4 numbers have been entered and calls it to the actual door at the end.
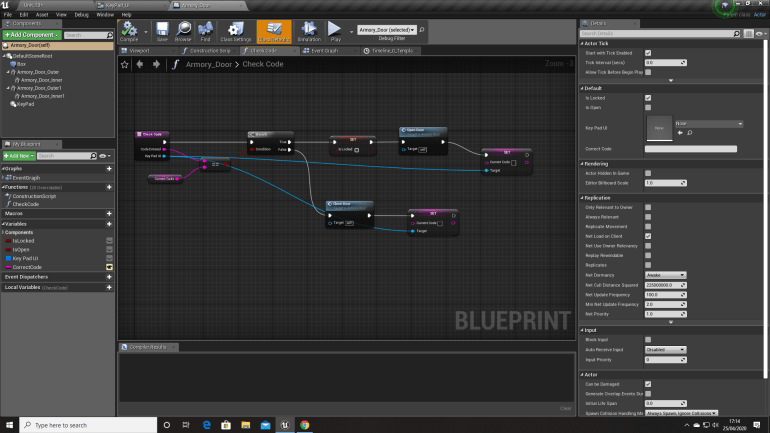
This Blueprint checks if the code is correct, it gets the code from the previous blueprint. It checks if it’s correct and sets the door to Unlocked and opens the door if it’s correct and it stays Locked if the code is Incorrect.
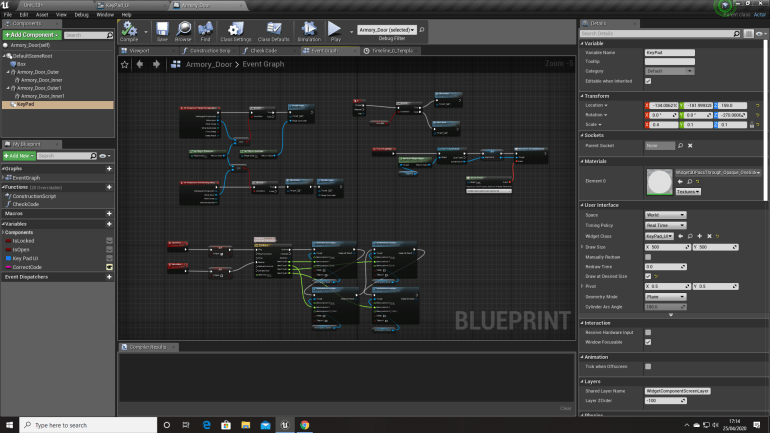
The Top Left Blueprint only allows the player to activate the door and also enables and disables input depending on if the player is inside of the Box Collision. This allows ‘E’ to be pressed which allows the door to be opened at will as-long as the player’s inside of the Box Collision and the Code has been entered previously and this is the Top Right Blueprint. The bottom Blueprint plays the animation of the door opening.
One of the areas you have to pass through is the Armory inside of the base and since the entrance in was relatively secure with a Keypad I wanted the inside so be secure to so I added locked doors inside that require different keys to open. After doing this you would be able to get onto a walkway above and drop down into a room and unlocked a switched door that would lead into a room with a hatch that would lead into an area where the objective of the game is.
I wanted the area to feel the same as the rest of the environment but slightly different so I separated 4 rooms off from the others with wire mesh that I made in 3DS Max and locked doors that require certain keys.

I made the Wire Mesh using a tutorial on YouTube I found and originally I thought it was going to be quite difficult to create but after watching the video I noticed it was as complex as I first thought and made a small section that I could use in my game. Building this also allowed me to become more in tune with the line tool in 3DS Max using splines which allows me to create more advanced models and assets.
‘3DS MaX Tutorial – Modeling Wire Mesh with spline, 2019, (Video) Date Accessed 5,5,20’
I also created a few different weapon lockers to fill the Armory with that I made in UE4, I placed the Shotgun and Ammo models that I made in 3DS Max. I think they fit into the environment well and don’t look out of place.
After finishing the Armory and majority of the base I spent a bit of time walking through it in the editor and was disappointing with it, it was a very linear environment and wanted to do more for my final game, since it would be important for University.
I was making the environment bigger so I needed assets to fill them so it wasn’t just empty space and felt like it had a purpose. I created a Generator in 3DS Max with animations of the pistons rising and falling to give the impression that it’s actually producing power for the base. I also placed some wires and cables running along the floor that I also made in 3DS Max using the line tool and then added the shell modifier, to create a cable.
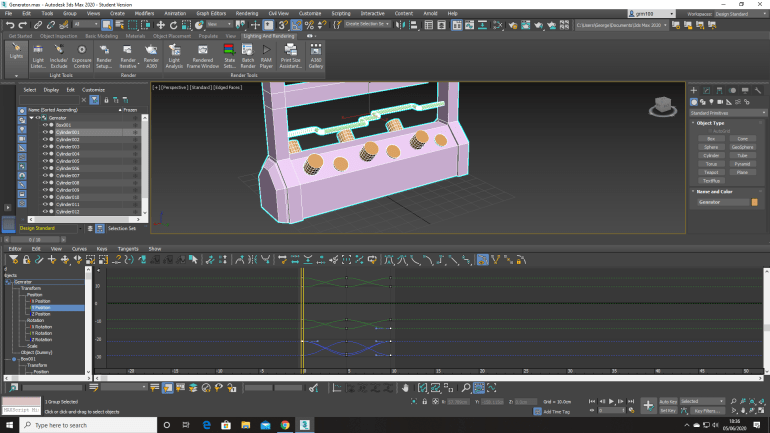
When making the Generator I had an image of what I wanted it to look like in my mind and the sort of animation it could have attached to it, it was a very simple model to make and was made using a single box and the ‘Edit Poly’ modifier, the animation was the most time consuming part, it wasn’t because it was difficult the animation is fairly simple and a case of trial and error just to get the ‘Pistons’ to move up and down, however the reason it took so long was because I had to repeat myself 12 times over to give each separate one to move properly and the finished animation is only 10 Frames long.
I also wanted to change the Armory because I thought it was a little lacklustre, it was a small area that I wanted to make bigger.
I decided to make the Armory bigger because I wanted to include a surveillance room too because it felt like something you would see in a place like this. The armoury consists of 4 main rooms placed against the 2 wider walls with locked doors that require certain keys which can be found around the level.
This room contains Weapon Lockers and tables I made. the Shotguns in the Lockers I originally intended for the player to use as a secondary weapon that they could switch too, I even created the model in 3DS Max with shooting and reloading animations just like the pistol.
However due to how advanced the Blueprinting was I couldn’t do it since it would require me to delete all the previous BPs and start all over again and that wasn’t a sacrifice I wanted to make since it wasn’t completely needed, but serves as a lesson which is plan ahead and really think something over before doing it.
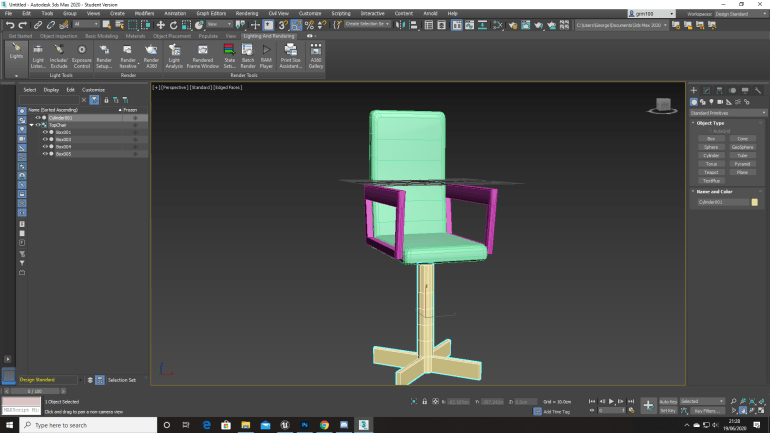
The Surveillance room was something I had to put some thought into because the were a different ideas I had in mind, but I settled on some desks and a large bank of monitors.

After spending some time thinking I ended up moving a few things around and added another bank of monitors and added a bookshelf I made in 3DS Max as well as an Office Chair.

The chairs I made were kind of difficult to make just because of their strange shape and getting them to scale with the character and other objects in the UE4 editor.
I also wanted to add Notes that tell you wants happening and help the player by giving them a vague idea of where a Key they might need is and letting them find it without telling them exactly where it is because that takes away from the game and makes it less fun for the player because the’s no challenge or difficulty.
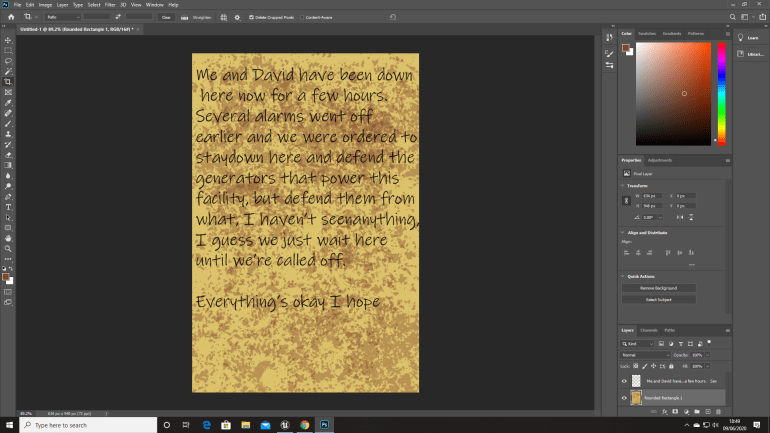
I made the notes in Photoshop I begun with a background worn paper colour and then used the brush tool to add wear and detail to the Notes and then added Text using a font that I found that I thought was close enough to actual writing. I wanted them to tell a story and very vaguely guide the player around the level, because I wanted the player to make their own way round but having a vague idea of where they needed to end up.
I also had one scenario in particular where you can see a dead soldier with a Key on him that you need to advance the’s a note that you can read and reads something like ‘The is a hatch upstairs somewhere that lets you drop into this room and the a Key for it near the Dormitory’ so it gives the player an idea of how to advance but without actually telling them where to go specifically.
I used a YouTube tutorial for the Notes in my game since I’ve never done anything like this before and had no idea where to start.
‘UE4 Tutorial, Press key To Read Letter/Note, 2015, (Video), Date Accessed 7,6,20’
The enemies in the game were originally going to be Demonic Zombies, but I decided to turn them into Plague Doctors because I thought they would be scarier since their just a figure moving towards you wearing a mask and a large overcoat, and require slightly less effort which will allow me to spend less time on them so I can spend it on other things in my game.
I took the original Soldier Outfit and used it as a base for my Plague Doctor enemy that would be present in my game. I knew that Plague Doctors are unintentionally creepy because of what their job used to be they would have no bare skin exposed which I believe adds to the disturbing aura that they give off if that makes sense. However I still researched images of them so I could still get a feel of how they look and a more detailed idea of what their clothes look like.
I first decided to make the large coats they wear, since that was the largest part of them. I used the bottom of the Jackets as a start and began to shape the rest of the coat going downwards making sure it wasn’t too wide or too narrow and actually looked realistic.
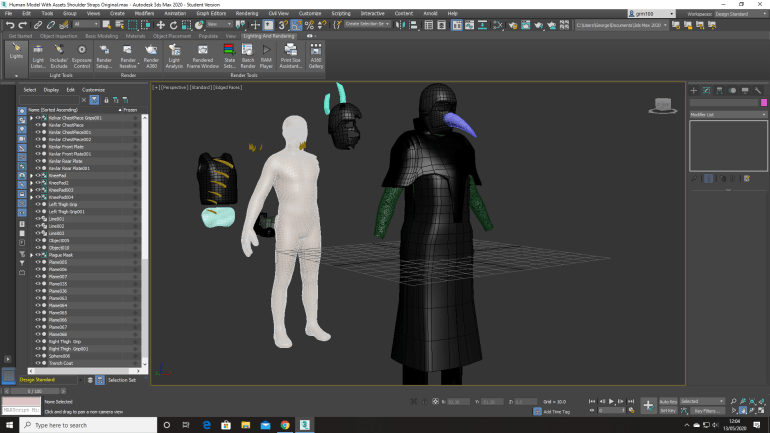
Afterwards I began working on the most defining feature of them the mask and Hat, originally I was just going to place a curved cone onto the mask I made to look like the beak, but it didn’t look right and thought I should make the Hats they used to wear, and made one, which I think improved the look.
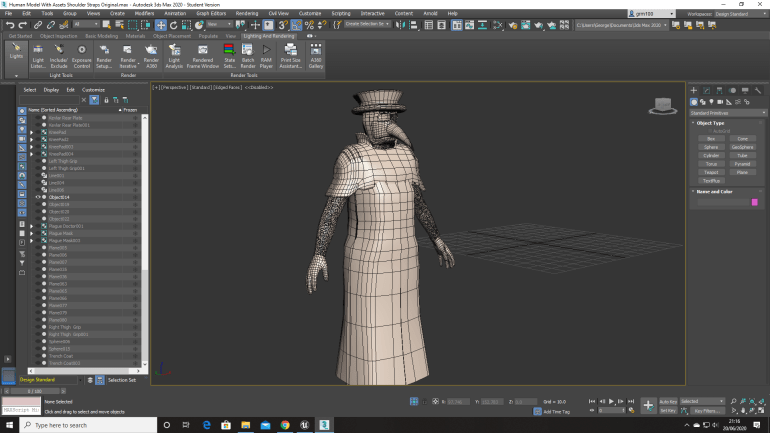
As well as adding the proper hat I also decided to give the model a ‘Mantle’ which is the reinforced part that sits on their shoulders.
I then exported the finished model to Mixamo to give it a few animations rather than giving it my own because I’d decided they would take to long to make and rigging the skeleton and everything else would be a pain since I’d also never done it before in previous project.
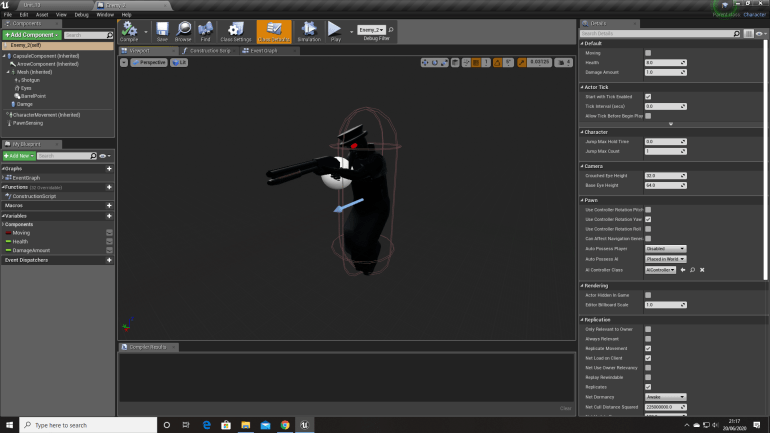
After moving it into UE4, I placed it inside a character BP, and gave it some Blueprinting so that it worked.
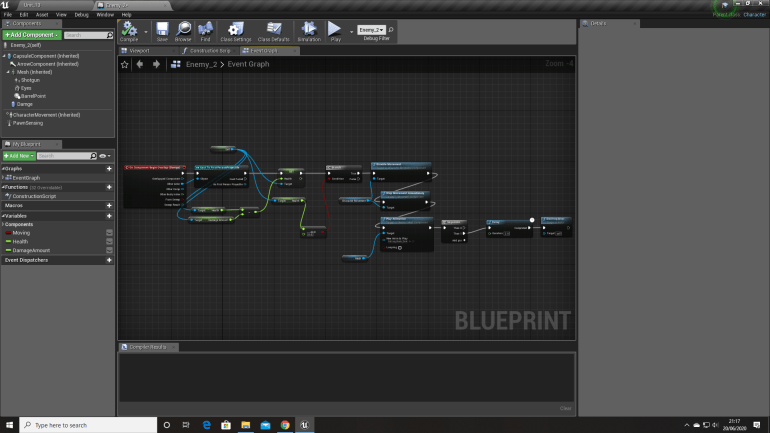
This Blueprint allows the Enemy to be shot and killed by the player by using floats with specific numbers linked to them allowing the Enemy to know when it’s been hit using a Collision Capsule, and when it does die the Blueprint stops it from moving and eventually after a short delay removes the Actor from the game.
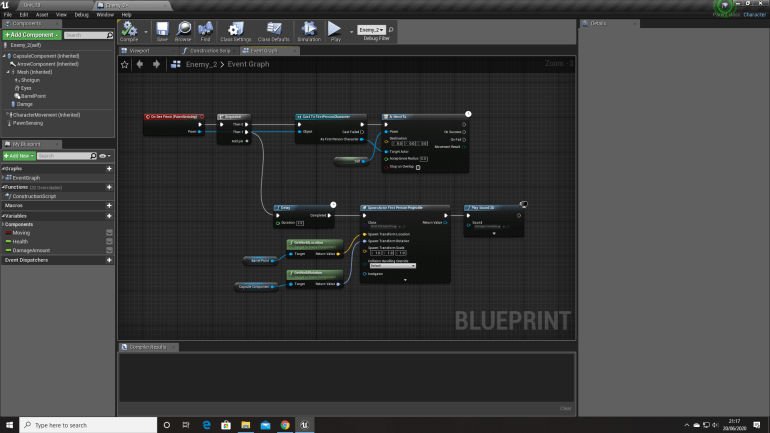
This Blueprint uses a ‘Pawn-sensing’ node as it’s start which only triggers if the Player steps into the Eye Line of the Enemy, the Plague Doctor will then chase the player relentlessly while firing at the Player with a shotgun every few seconds giving the player either a choice to fight a or try and break sight with the Enemy.
